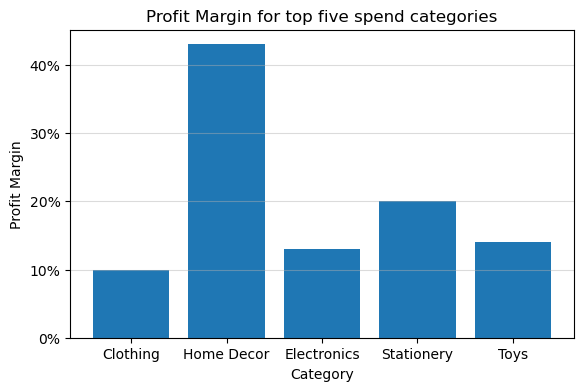
import matplotlib.pyplot as plt
import matplotlib.ticker as mtick
import numpy as np
import pandas as pd


def percent_formatter(x, pos):
    return f"{x * 100:.0f}%"


# Dummy Data
df = pd.DataFrame(
    [
        ["Clothing", 0.1],
        ["Home Decor", 0.43],
        ["Electronics", 0.13],
        ["Stationery", 0.2],
        ["Toys", 0.14],
    ],
    columns=["Spend_Category", "Profit_Margin"],
)

# Define figure
fig, ax = plt.subplots(figsize=(6.5, 4))

# Create bar plot
plt.bar(df["Spend_Category"], df["Profit_Margin"])

# Convert y-axis labels to percentage
ax.yaxis.set_major_formatter(mtick.FuncFormatter(percent_formatter))

# show grid
plt.grid(axis="y", alpha=0.45)

# set title and and x-y label
plt.title("Profit Margin for top five spend categories")
plt.ylabel("Profit Margin")
plt.xlabel("Category")

plt.show()고급 Matplotlib 시각화
matplotlib의 기본 플롯은 결코 “전문가”처럼 보이지 않기 때문에 사람들은 다른 Plotly와 같은 다른 시각화 라이브러리를 사용하고는 합니다. 그러나 대부분의 경우 matplotlib의 사용자 정의 기능을 사용한다면 충분히 전문가 같은 시각화를 할 수 있습니다.
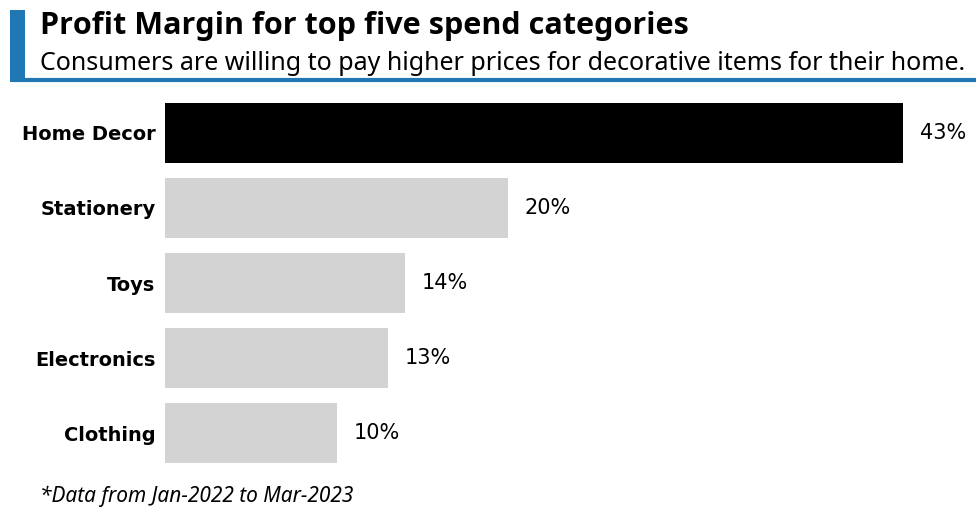
아래의 예시는 모두 matplotlib을 사용하여 만들어졌고 두 번째 플롯이 첫번째 플롯보다 훨씬 더 우아하고, 유익하며, 매력적으로 보입니다. 왜냐하면 아래의 조건을 충족하기 때문이죠.
- 제목과 부제는 메세지를 전달하는 데 크게 도움이 됩니다.
- 주석은 기본 플롯에 없는 추가적인 중요 정보를 제공합니다.
- 일부 그래프를 굵게 표현해 시각적 주의를 끌고 중요성을 강조합니다.
좋은 시각화는 보는 사람의 입장에서 최소한의 노력이 필요해야 한다는 것입니다. 따라서 전문가 같은 시각화를 위해 추가적인 노력을 기울이는 것이 중요합니다.
추가적인 설명 없이도 시각화 자료가 올바른 스토리를 전달하도록 하세요.
0.1 기본 matplotlib 플랏
0.2 사용자 정의를 곁들인 matplotlib 플랏
# 원본 데이터를 생성하고, 'Profit_Margin' 기준으로 오름차순 정렬합니다.
df = pd.DataFrame(
    [
        ["Clothing", 0.1],
        ["Home Decor", 0.43],
        ["Electronics", 0.13],
        ["Stationery", 0.2],
        ["Toys", 0.14],
    ],
    columns=["Spend_Category", "Profit_Margin"],
)

df = df.sort_values("Profit_Margin", ascending=True, ignore_index=True)

fig, ax = plt.subplots(figsize=(10, 6))
fig.set_facecolor("white")  # Figure 전체 배경색
ax.set_facecolor("white")  # 플롯 영역(Axes) 배경색

# 공통 폰트 설정
TITLE_FONT = "Noto Sans"

# 메인 제목
fig.text(
    0,
    0.91,  # x, y 위치 (Figure 좌측 하단이 0,0)
    "Profit Margin for top five spend categories",
    fontfamily=TITLE_FONT,
    fontweight="bold",
    fontsize=22,
    ha="left",  # 수평 왼쪽 정렬
)

# 부제목
fig.text(
    0,
    0.85,
    "Consumers are willing to pay higher prices for decorative items for their home.",
    fontfamily=TITLE_FONT,
    fontsize=18,
    ha="left",
)

# 막대 색상 동적 생성 (마지막 값만 검은색으로 강조)
n_bars = len(df)
bar_colors = ["lightgray"] * (n_bars - 1) + ["black"]

# 수평 막대 그래프 그리기 (ax 객체 사용)
bars = ax.barh(df["Spend_Category"], df["Profit_Margin"], color=bar_colors, edgecolor="none")

# 각 막대에 백분율(%) 형식으로 값을 표시합니다.
ax.bar_label(bars, labels=[f"{x:.0%}" for x in bars.datavalues], padding=12, fontsize=15)

# y축 여백을 설정하여 그래프가 잘리지 않게 합니다.
ax.margins(y=0.14)

# 모든 축(spines)을 보이지 않게 처리
ax.spines["top"].set_visible(False)
ax.spines["right"].set_visible(False)
ax.spines["bottom"].set_visible(False)
ax.spines["left"].set_visible(False)

# x축 눈금과 레이블 제거
ax.set_xticks([])

# y축 눈금선 제거 및 레이블 폰트 설정
ax.tick_params(axis="y", left=False)  # y축 눈금선(tick line) 제거
# y축 레이블(Spend_Category) 폰트 설정 (plt.yticks 대신 ax 메서드 사용)
ax.set_yticklabels(df["Spend_Category"], fontsize=14, fontweight="bold")

# (1) 제목 아래 파란색 구분선
ax.plot(
    [-0.025, 0.94],  # 선의 시작/끝 x좌표
    [0.8335, 0.8335],  # 선의 시작/끝 y좌표
    transform=fig.transFigure,  # Figure 기준 좌표계 사용
    clip_on=False,  # Figure 영역 밖으로 그려도 자르지 않음
    color="tab:blue",
    linewidth=3,
)

# (2) 왼쪽 파란색 강조 사각형
ax.add_patch(
    plt.Rectangle(
        (-0.03, 0.95),  # 사각형 좌측 하단 (x, y)
        0.015,
        -0.12,  # 너비, 높이
        facecolor="tab:blue",
        transform=fig.transFigure,
        clip_on=False,
        linewidth=0,
    )
)

# (3) 각주(Footnote)
fig.text(
    0,
    0.13,
    "*Data from Jan-2022 to Mar-2023",
    fontfamily=TITLE_FONT,
    fontstyle="italic",
    fontsize=15,
    ha="left",
)

plt.show()
/tmp/ipykernel_150474/1225230903.py:73: UserWarning: set_ticklabels() should only be used with a fixed number of ticks, i.e. after set_ticks() or using a FixedLocator.
ax.set_yticklabels(df['Spend_Category'], fontsize=14, fontweight='bold')1 플랏에 추가 정보 제공하기
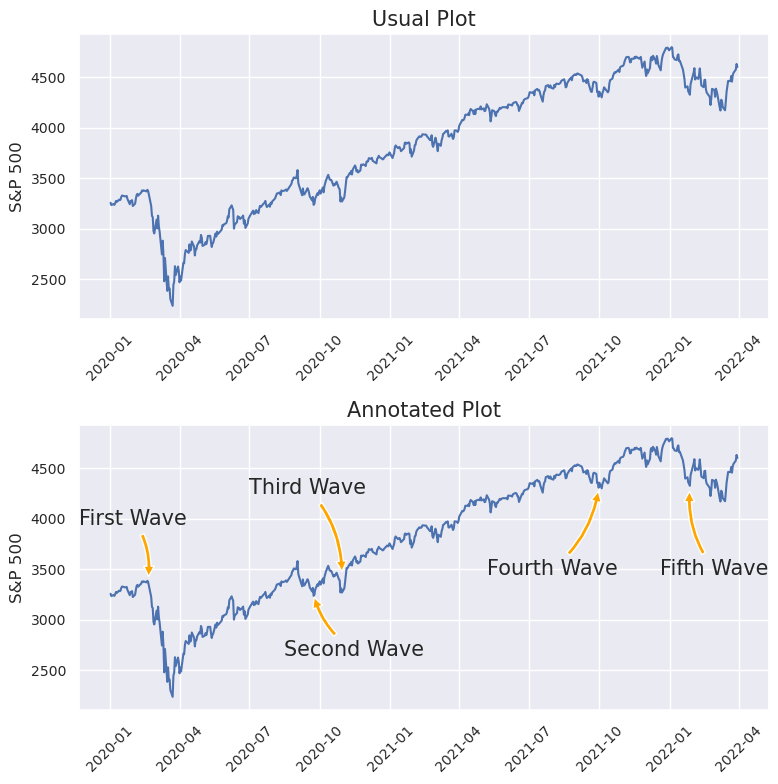
데이터 시각화를 하다보면 종종 특히 중요한 부분들이 있기 마련입니다. 그리고 훌륭한 데이터 스토리텔러는 플롯이 보는 사람의 시선을 이러한 핵심 영역으로 유도하도록 만들어야 합니다. matplotlib에서는 annotate()를 사용해 주석을 추가할 수 있습니다.
1.1 주석 플롯(Annotated Plot)
주석 플롯은 플롯에 설명 텍스트를 추가하여, 보는 사람의 시선을 특정 영역으로 유도하고 이해를 돕도록 합니다.
import matplotlib.pyplot as plt
import numpy as np
import pandas as pd
import seaborn as sns
import yfinance

# Matplotlib의 날짜 변환기를 pandas용으로 등록 (호환성 향상)
pd.plotting.register_matplotlib_converters()

sns.set()

# -- 0. 데이터 준비 --
# yfinance 데이터 다운로드 (두 플롯에서 공유)
raw_data = yfinance.download(tickers="^GSPC", start="2020-01-01", end="2022-03-31", interval="1d")

# -- 1. Figure 및 2개의 Subplots 생성 (2행 1열) --
fig, axs = plt.subplots(nrows=2, ncols=1, figsize=(8, 8))

# 명확성을 위해 각 subplot을 별도 변수에 할당
ax1 = axs[0]
ax2 = axs[1]

# -- 2. 첫 번째 플롯 (ax1) - Usual Plot --
ax1.plot(raw_data.index, raw_data.Close)

# plt.xlabel -> ax1.set_xlabel
ax1.set_xlabel("")
ax1.set_ylabel("S&P 500", size=12)
# plt.title -> ax1.set_title
ax1.set_title("Usual Plot", size=15)

# plt.xticks -> ax1.tick_params
ax1.tick_params(axis="x", labelsize=10, rotation=45)
ax1.tick_params(axis="y", labelsize=10)


# -- 3. 두 번째 플롯 (ax2) - Annotated Plot --
ax2.plot(raw_data.index, raw_data.Close)

# First peak annotation
ax2.annotate(
    "First Wave",
    (pd.to_datetime("2020-02-20"), 3400),
    (pd.to_datetime("2020-01-31"), 4000),
    size=15,
    va="center",
    ha="center",
    arrowprops={"arrowstyle": "simple", "facecolor": "orange", "connectionstyle": "arc3,rad=-0.2"},
)

# Second peak annotation
ax2.annotate(
    "Second Wave",
    xy=(pd.to_datetime("2020-09-23"), 3250),
    xytext=(pd.to_datetime("2020-11-15"), 2700),
    size=15,
    va="center",
    ha="center",
    arrowprops={"arrowstyle": "simple", "facecolor": "orange", "connectionstyle": "arc3,rad=-0.2"},
)

# Third peak annotation
ax2.annotate(
    "Third Wave",
    xy=(pd.to_datetime("2020-10-30"), 3450),
    xytext=(pd.to_datetime("2020-09-15"), 4300),
    size=15,
    va="center",
    ha="center",
    arrowprops={"arrowstyle": "simple", "facecolor": "orange", "connectionstyle": "arc3,rad=-0.2"},
)

# Fourth peak annotation
ax2.annotate(
    "Fourth Wave",
    xy=(pd.to_datetime("2021-09-30"), 4300),
    xytext=(pd.to_datetime("2021-07-31"), 3500),
    size=15,
    va="center",
    ha="center",
    arrowprops={"arrowstyle": "simple", "facecolor": "orange", "connectionstyle": "arc3,rad=-0.2"},
)

# Fifth peak annotation
ax2.annotate(
    "Fifth Wave",
    xy=(pd.to_datetime("2022-01-27"), 4300),
    xytext=(pd.to_datetime("2022-02-28"), 3500),
    size=15,
    va="center",
    ha="center",
    arrowprops={"arrowstyle": "simple", "facecolor": "orange", "connectionstyle": "arc3,rad=-0.2"},
)

# plt.xlabel -> ax2.set_xlabel
ax2.set_xlabel("")
ax2.set_ylabel("S&P 500", size=12)
# plt.title -> ax2.set_title
ax2.set_title("Annotated Plot", size=15)

# plt.xticks -> ax2.tick_params
ax2.tick_params(axis="x", labelsize=10, rotation=45)
ax2.tick_params(axis="y", labelsize=10)


# -- 4. 전체 Figure 표시 --
# 플롯들이 겹치지 않도록 레이아웃 자동 조정
plt.tight_layout()
plt.show()
/tmp/ipykernel_150474/1802525514.py:14: FutureWarning: YF.download() has changed argument auto_adjust default to True
raw_data = yfinance.download(tickers="^GSPC", start='2020-01-01',
[*********************100%***********************] 1 of 1 completed또 다른 추가 정보를 제공하는 또 다른 훌륭한 방법은 플롯에 확대된 그림을 추가하는 것입니다. matplotlib에서는 indicate_inset_zoom()을 사용하여 수행할 수 있습니다. 이 함수는 표시 상자(indicator box)를 추가하며, 더 명확하게 보기 위해 확대(zoom-in)할 수 있습니다. 삽입된 플롯은 다른 matplotlib 플롯과 동일하게 취급됩니다. 따라서 필요하다면 축 레이블을 추가할 수도 있습니다.
2 스파크라인(Sparkline plot) 플롯
훨씬 더 많은 관심을 받을 자격이 있는 데이터 시각화의 숨겨진 보석
Jupyter에서 데이터 분석 작업을 수행할 때, 우리는 대부분 독립형 차트와 시각 자료를 만듭니다. 물론, 그것이 잘못된 것은 아니지만 스파크라인(Sparklines)이라고 불리는 시각화는 공간을 많이 차지하지 않으면서 데이터를 시각화하는 매우 우아한 방법을 제공합니다.
스파크라인은 전통적인 플롯과 달리 축 눈금(axis ticks)과 레이블을 생성하지 않습니다. 제가 스파크라인을 사용하는 것을 선호하는 가장 멋진 방법 중 하나는 아래에서 보듯이 DataFrame의 셀에 스파크라인을 추가하는 것입니다.
# HTML 렌더링 및 base64 인코딩을 위한 라이브러리
from base64 import b64encode
from io import BytesIO

import matplotlib.pyplot as plt
import numpy as np
import pandas as pd
from IPython.display import HTML
from matplotlib_inline.backend_inline import set_matplotlib_formats

# Jupyter/IPython 환경에서 SVG 형식으로 플롯을 기본 표시하도록 설정
# (참고: 이것은 최종 HTML 테이블에 삽입되는 PNG와는 별개입니다.)
set_matplotlib_formats("svg")

# 사용할 색상 팔레트
colors = ["#fe7c73", "#2471A3", "#3498DB", "#27AE60"]


def _fig_to_html_img(fig):
    """
    Matplotlib Figure 객체를 받아 base64로 인코딩된
    PNG HTML img 태그로 변환합니다.
    Sparkline에 최적화되어 있습니다.
    """
    # 그림을 저장할 인메모리 바이트 버퍼 생성
    img_buffer = BytesIO()
    # 그림을 버퍼에 PNG 형식으로 저장
    # bbox_inches='tight', pad_inches=0 : 플롯 주변의 불필요한 공백 제거
    fig.savefig(img_buffer, format="png", bbox_inches="tight", pad_inches=0)
    # Figure 객체를 닫아 메모리 누수 방지 (매우 중요!)
    # .apply()로 많은 플롯을 생성할 때 필수입니다.
    plt.close(fig)
    # 버퍼에 저장된 이미지 데이터를 base64로 인코딩
    encoded = b64encode(img_buffer.getvalue())
    # base64 바이트 문자열을 utf-8 문자열로 디코딩
    decoded = encoded.decode("utf-8")
    # HTML img 태그 형식으로 반환
    return f'<img src="data:image/png;base64,{decoded}">'


def create_line_sparkline(data):
    """
    데이터 리스트를 받아 라인 플롯 형태의 Sparkline HTML을 생성합니다.
    """
    data = list(data)

    # 그래프 객체(figure)와 축(axes) 초기화 (배경 없음)
    fig, ax = plt.subplots(1, 1, figsize=(2, 0.5), facecolor="none")

    # 데이터의 시작 값과 끝 값을 비교하여 라인 색상 결정
    if data[0] > data[-1]:
        # 최신 가격(끝)이 시작 가격보다 낮으면 (하락) -> 빨간색
        chart_color = colors[0]
    else:
        # 최신 가격(끝)이 시작 가격보다 높거나 같으면 (상승/유지) -> 녹색
        chart_color = colors[3]

    # 라인 플롯 생성
    ax.plot(data, color=chart_color)
    # 마지막 데이터 지점에 마커(파란색 점) 추가
    # plt.plot() 대신 객체지향 ax.plot() 사용
    ax.plot(len(data) - 1, data[-1], "b.")
    # 모든 축(눈금, 레이블, 테두리)을 끔
    ax.axis("off")
    # 헬퍼 함수를 호출하여 Figure를 HTML 이미지 태그로 변환
    return _fig_to_html_img(fig)


def create_hist_sparkline(data):
    """
    데이터 리스트를 받아 히스토그램 형태의 Sparkline HTML을 생성합니다.
    """
    # 그래프 객체(figure)와 축(axes) 초기화 (배경 없음)
    fig, ax = plt.subplots(figsize=(2, 0.5), facecolor="none")
    # 히스토그램 생성
    ax.hist(data, bins=10, color=colors[2])
    # 모든 축(눈금, 레이블, 테두리)을 끔
    ax.axis("off")
    # 헬퍼 함수를 호출하여 Figure를 HTML 이미지 태그로 변환
    return _fig_to_html_img(fig)


# 더미 데이터 생성
n = 100
data_values = [
    ("APPL", 40000 * np.random.rand(n).round(2)),
    ("MSFT", 2000 * np.random.rand(n).round(2)),
    ("GOOG", 500 * np.random.rand(n).round(2)),
    ("META", 150 * np.random.rand(n).round(2)),
]
df = pd.DataFrame(data_values, columns=["Name", "Price History"])

# Sparkline 생성 적용: 라인 sparkline을 생성하여 'Day Price History' 컬럼에 저장
df["Day Price History"] = df["Price History"].apply(create_line_sparkline)

# 히스토그램 sparkline을 생성하여 'Hourly Trade Volume' 컬럼에 저장
df["Hourly Trade Volume"] = df["Price History"].apply(create_hist_sparkline)

# 참고: 'Hourly Trade Volume'은 순전히 데모 목적으로 생성되었습니다.
# 실제 이 스파크라인을 만들려면 시간 정보가 필요합니다.

# 위 데이터프레임을 HTML로 출력
# escape=False : 컬럼 내의 HTML(<img>) 태그가 문자열이 아닌 HTML로 렌더링되도록 함
# 원본 'Price History' 배열은 너무 크므로 최종 출력에서 제외
HTML(df.drop(columns=["Price History"]).to_html(escape=False))| Name | Day Price History | Hourly Trade Volume | |
|---|---|---|---|
| 0 | APPL | ||
| 1 | MSFT | ||
| 2 | GOOG | ||
| 3 | META |
3 리지라인 플롯
과소평가된 데이터 시각화
변수 내 여러 그룹 간의 분포 차이를 이해하는 것은 다음과 같은 영역의 통찰을 발견하는 데 유용합니다:
- 행동적 차이
- 피처 엔지니어링
- 예측 모델링 등
리지라인 플롯(아래 그림)은 다양한 변수(또는 변수의 카테고리)의 분포를 시각화하는 매우 간결하고 우아한 방법입니다. 더 구체적으로, 공통 축에 수직으로 쌓는 방식은 그룹 간의 비교를 쉽게 해주며 (이 방식이 없다면) 이해하기 어려웠을 분포의 형태와 변동에 대한 많은 통찰을 줍니다.리지라인을 통해 우리는 여러 그룹의 분포를 나란히 비교하고 그 차이점을 이해할 수 있습니다.
seaborn라이브러리도 리지라인 플롯을 생성하는 방법을 제공하지만, 저는joypy라이브러리가 더 유용하고 사용하기 쉽다고 자주 생각합니다.
3.1 리지라인 플랏은 언제 사용해야 하는가?
일반적으로 리지라인 플롯은 변수에 3~4개 이상의 그룹이 있을 때 사용하는 것이 합리적입니다. 이는 단일 플롯에서 시각화할 때 발생할 수 있는 겹침을 피하기 위함입니다. 또한, 리지라인 플롯은 그룹 간에 표시되는 연속형 변수에서 다음과 같이 명확한 패턴이나 순위가 있을 때 더 유용합니다.
- 단조로운 증가(monotonically increasing)
- 단조로운 감소(monotonically decreasing)
- 증가 후 감소 혹은 감소 후 증가 등
그렇기 때문에 그룹의 분포를 수직으로 쌓는 순서가 매우 중요해집니다.
import warnings
from datetime import date, timedelta

import matplotlib.pyplot as plt
import numpy as np
import pandas as pd
from joypy import joyplot  # 'joypy' 라이브러리가 설치되어 있어야 합니다.
from pandas.api.types import CategoricalDtype

# 경고 메시지 무시 (디버깅 시에는 주석 처리하는 것이 좋습니다)
warnings.filterwarnings("ignore")

# --- 더미 데이터 (가상 데이터) 정의 ---

# 월별 평균 기온 및 표준 편차
max_temps = [20.5, 24.6, 30.4, 36.9, 40.9, 39, 35.8, 34.5, 34.3, 33.1, 28.3, 23]
# min_temps 리스트의 불필요한 마지막 13번째 값(19)을 제거했습니다.
min_temps = [7.6, 10.8, 15.7, 21.3, 25.6, 27.6, 27.3, 26.6, 24.9, 19.3, 12.9, 8.3]
std_devs = [1, 2, 3]  # 무작위로 선택할 표준 편차
months = [
    "January",
    "February",
    "March",
    "April",
    "May",
    "June",
    "July",
    "August",
    "September",
    "October",
    "November",
    "December",
]


# --- 데이터 생성 (리팩토링됨) ---
# df.append() 대신, 리스트에 딕셔너리를 추가한 후 DataFrame을 한 번에 생성합니다.

# 데이터를 저장할 빈 리스트 초기화
data_list = []

# 1년 치 각 날짜에 대한 데이터 생성
start_date = date(2023, 1, 1)
end_date = date(2023, 12, 31)
current_date = start_date

while current_date <= end_date:
    # 리스트 인덱싱을 위해 월을 0부터 시작하도록 조정 (1월 -> 0)
    month_index = current_date.month - 1

    # 정규 분포를 따르는 임의의 최고/최저 기온 생성
    max_temp = np.random.normal(max_temps[month_index], std_devs[np.random.randint(0, 3)])
    min_temp = np.random.normal(min_temps[month_index], std_devs[np.random.randint(0, 3)])

    # 데이터를 딕셔너리 형태로 리스트에 추가
    data_list.append(
        {
            "Day": current_date.day,
            "Month": months[month_index],
            "min_temp": min_temp,
            "max_temp": max_temp,
        }
    )

    # 다음 날짜로 이동
    current_date += timedelta(days=1)

# 루프 종료 후, 리스트로부터 DataFrame을 한 번에 생성
df = pd.DataFrame(data_list)

# 'Month' 컬럼을 월 순서대로 정렬되는 범주형(Categorical) 타입으로 변환
# (플롯팅 시 월 순서를 보장하기 위함)
month_dtype = CategoricalDtype(categories=months, ordered=True)
df["Month"] = df["Month"].astype(month_dtype)


# --- Joy Plot (능선도) 생성 ---

# joyplot이 (Figure, Axes) 객체를 반환합니다. (순서 수정: fig, ax)
# 불필요한 plt.figure() 호출을 제거했습니다.
fig, ax = joyplot(
    data=df[["min_temp", "max_temp", "Month"]],
    by="Month",  # 'Month'를 기준으로 그룹화
    column=["min_temp", "max_temp"],  # 플롯을 그릴 컬럼들
    color=["#2471A3", "#fe7c73"],  # 각 컬럼에 대한 색상
    #     legend=True,                         # 범례 (필요시 주석 해제)
    alpha=0.85,  # 투명도
    figsize=(6, 4),  # Figure 크기
)

# Figure 전체의 제목 설정 (plt.title 대신 사용)
fig.suptitle("Min Max Temperature Distribution)", fontsize=12, y=1.01)  # y 값으로 제목 위치 조정

plt.show()
4 결측 데이터를 위한 kNN 대체법
데이터 사이언스에서 결측치(missing data)에 대한 대체(imputation) 전략은 결측의 유형에 크게 좌우되며, 결측 유형에는 세 가지가 있습니다:
- MCAR (완전 무작위 결측): 데이터가 진정으로 무작위하게 누락되었으며, 관측된 변수나 관측되지 않은 변수와 아무런 관련이 없는 경우입니다.
- MAR (무작위 결측): 특정 피처(feature)의 결측이 데이터셋의 다른 관측된 피처들에 의해 설명될 수 있는 경우입니다.
- MNAR (비무작위 결측): 결측이 결측값 자체 또는 우리가 데이터를 수집하지 않은 피처(들)에 기인하는 경우입니다.
저는 실제 상황에서 다른 두 유형보다 MAR (무작위 결측)이 상대적으로 훨씬 더 많이 나타나는 것을 관찰했습니다. 그래서 여기에서는 제가 주로 사용하는 kNN 대체법을 공유하고자 합니다.
4.1 kNN 대체법(kNN imputation)
이 방법은 k-최근접 이웃(k-nearest neighbors) 알고리즘을 사용하여 결측값을 대체합니다. 구체적으로는 결측이 아닌 피처 값들에 kNN을 실행하여 결측된 피처를 대체하며 아래의 단계를 따릅니다.
- 1단계: 결측값이 있는 행 (r)을 선택합니다.
- 2단계: 결측이 아닌 피처 값들을 사용하여 해당 행의 k개의 최근접 이웃을 찾습니다.
- 3단계: k개의 최근접 이웃 행들에 해당하는 (결측이 아닌) 값들을 사용하여 행 (r)의 결측된 피처를 대체합니다.
- 4단계: 결측값이 있는 모든 행에 대해 반복합니다.
4.2 여러 결측치 대체 방법을 비교하는 시각화
import warnings

import matplotlib.pyplot as plt
import numpy as np
import pandas as pd
import seaborn as sns
from sklearn.impute import KNNImputer, SimpleImputer

# 경고 메시지 무시
warnings.filterwarnings("ignore")
sns.set()

# 플롯을 위한 기본 설정
plt.rcParams["font.family"] = ["Noto Sans", "sans-serif"]
colors = [
    "#fe7c73",
    "#2471A3",
    "#3498DB",
    "#27AE60",
    "#82E0AA",
    "#D35400",
    "#5D6D7E",
    "#E74C3C",
    "#21618C",
    "#B7950B",
    "#46C7C7",
    "#00B9FF",
    "#FF7051",
    "orange",
    "darkorange",
    "tomato",
    "coral",
    "limegreen",
    "lightsalmon",
]

# --- 1. 결측치가 포함된 더미 데이터셋 생성 ---
size = 1000
data = np.random.normal(loc=2, scale=2, size=(size, 3))  # 정규분포를 따르는 무작위 데이터 생성
mask = np.random.rand(size, 3) < 0.2  # 20% 확률로 결측치를 만들기 위한 마스크(mask) 생성
data[mask] = np.nan  # 마스크를 적용하여 결측치(NaN) 설정

# --- 2. 다양한 방법으로 결측치 대체 ---

# 평균값 대체(Mean Imputation)
mean_imputer = SimpleImputer(strategy="mean")
data_imputed_mean = mean_imputer.fit_transform(data)

# 0으로 대체(Zero Imputation)
zero_imputer = SimpleImputer(strategy="constant", fill_value=0)
data_imputed_zero = zero_imputer.fit_transform(data)

# kNN 대체 (n_neighbors=5)
knn_imputer = KNNImputer(n_neighbors=5)
data_imputed_knn = knn_imputer.fit_transform(data)

# --- 3. Subplot을 사용하여 4개의 플롯을 하나로 합치기 ---

# 2x2 서브플롯 그리드(grid) 생성. figsize로 전체 크기 조절
fig, axes = plt.subplots(nrows=2, ncols=2, figsize=(8, 6))

# (0, 0) 위치: 원본 데이터 분포
axes[0, 0].hist(data.flatten(), bins=45, edgecolor="black", color=colors[1])
axes[0, 0].set_title("Original Distribution", size=14, pad=10)
axes[0, 0].set_xlabel(
    "Value",
    size=12,
)
axes[0, 0].set_ylabel(
    "Frequency",
    size=12,
)

# (0, 1) 위치: 평균값 대체(Mean Imputation) 분포
axes[0, 1].hist(data_imputed_mean.flatten(), bins=45, edgecolor="black", color=colors[16])
axes[0, 1].set_title("Mean Imputation", size=14, pad=10)
axes[0, 1].set_xlabel(
    "Value",
    size=12,
)
axes[0, 1].set_ylabel(
    "Frequency",
    size=12,
)

# (1, 0) 위치: 0으로 대체(Zero Imputation) 분포
axes[1, 0].hist(data_imputed_zero.flatten(), bins=45, edgecolor="black", color=colors[16])
axes[1, 0].set_title("Zero Imputation", size=14, pad=10)
axes[1, 0].set_xlabel(
    "Value",
    size=12,
)
axes[1, 0].set_ylabel(
    "Frequency",
    size=12,
)

# (1, 1) 위치: kNN 대체(kNN Imputation) 분포
axes[1, 1].hist(data_imputed_knn.flatten(), bins=50, edgecolor="black", color=colors[18])
axes[1, 1].set_title("kNN Imputation (k=5)", size=14, pad=10)
axes[1, 1].set_xlabel(
    "Value",
    size=12,
)
axes[1, 1].set_ylabel(
    "Frequency",
    size=12,
)

# 레이아웃 자동 조정 (메인 제목과 겹치지 않도록 rect 파라미터로 상단 여백 확보)
plt.tight_layout(rect=[0, 0.03, 1, 0.95])

# 모든 플롯을 한 번에 표시
plt.show()
위 결과를 보면 평균(mean) 대체 또는 0(zero) 대체 대비 kNN 대체가 갖는 효과는 위 시각화에서 명확하게 드러납니다. 왼쪽 위에는 결측값이 있는 피처의 분포가 있습니다. 데이터가 MAR(무작위 결측)임을 이미 검증했다고 가정할 때 아래 그림과 같이 평균/0 대체를 사용하면 요약 통계량과 분포가 변경됩니다. 하지만 오른쪽 아래 그림에서 보듯이 kNN 대체(imputer)는 더 신뢰할 수 있는 것으로 보이며 요약 통계량을 보존하고 있습니다.
5 Reference
- Daily Dose of Data Science: Enrich Matplotlib Plots with Annotations


